Setting up Timekeeper Employees
Employee Settings to Complete Before Launching Timekeeping:
It's very important that all employee and location settings are completed before launching timekeeping with your employees. Ensuring all of the settings are correct will save you and your managers time later on helping employees with issues that stem from incomplete settings.
Usernames and Passwords
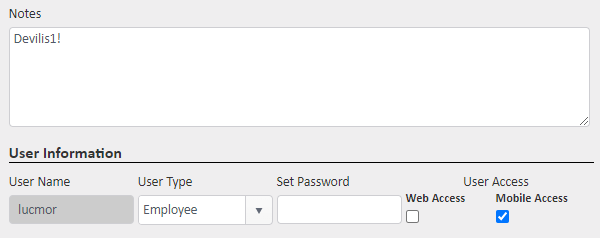
Employees that will be using the JM Connect app for clocking in and out will need usernames and passwords provided to them. We recommend setting the passwords for your employees using these steps and saving the employee's password in the Notes section just above. This helps save time in the case of an employee forgetting their username or password.
Personal Information
Employees can also use the Forgot Password option on JM Connect which will grant them temporary access if they can enter personal information that matches up with the personal information saved in their employee settings. It helps to ensure the right information is stored in the employee's username, social security number, date of birth, and phone number fields in case they need to use this option.
User Types
Any employees and managers that will be using JM Connect for timekeeping will need the proper user settings for the jobs they will be completing. Employees who will only be using JM Connect for clocking in and out and daily work only need to be listed as Employee user types and have Mobile Access checked as shown in the screenshot above. Click here for more information on User types and Access settings.
Click here for more information on JM Connect icons for Manager vs Employee User Types.
Security Settings
Managers that will be performing more actions on the apps and website will need adjusted security settings to ensure they have access to do the work expected of them. For example, a Manager who will be editing time punches and clocking employees in or out from time to time will need Timekeeper Manager checked in their security settings.
To edit an employee or manager's security settings:
- Go to Employees > Manage Employees
- Click the Edit pencil for the employee you wish to edit
- Click User Settings near the top of the page
- Click the Security button at the bottom
- Adjust the checkboxes in each section to manage that employee's access to the system
Click here to review the available security settings.
Timekeeper Ref. IDs
Each employee who is going to be using the call-in timekeeping method will need a unique Timekeeper Ref. ID to identify them. The call-in prompt will ask the employee for their ID each time they call in to clock in or out.
To add or edit JM Timekeeper Ref. IDs:
- Go to Employees > Manage Employees
- Find the user you wish to edit and click the edit pencil in the actions column
- Locate the JM Timekeeper Ref. ID box and enter a unique ID for each employee. These IDs can be anywhere from 4-9 digits.
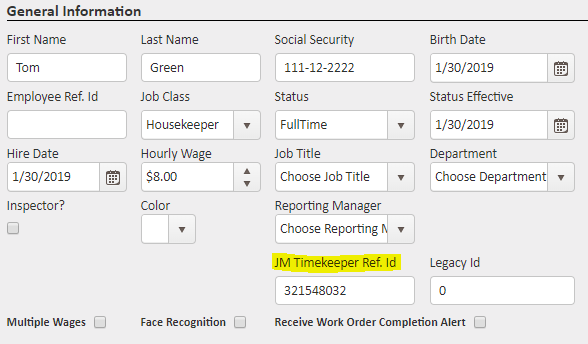
- Click Save
- Use the Change Employee dropdown to navigate to the next employee's settings and repeat step 3 above for each employee.
Train Employees on Locations
Marking an employee as "Trained" on locations means you are giving the employee access to complete functions in the app that could be related to their work at that location such as clocking in and out, supply requests, work orders, messaging, or checklists.
Employees need to be marked as Trained on any locations they are expected to do any of the above actions for. If employees are not trained on locations before accessing the app, they will be unable to perform the above functions until a system admin marks them as Trained in the proper locations.
Click here for more information on Training employees on locations.
To Train An Employee on Locations:
- Go to Employees > Manage Employees
- Find the employee you wish to update on the list and click the edit pencil in the action column
- Scroll down to the Location Information section and use the +Add buttons within the actions column on locations that employee needs to access
- Click the Save button
To Train All Employees on a Location:
- Go to Customers > Manage Locations
- Select the Assignments sub-tab
- At the top of the list of employees, select the button '+Train All Employees'
- Use the Customer and Location dropdowns to navigate to other locations that all employees need to be trained in and repeat step 3.
Job Classifications & Wages
Employees who will be using JM for timekeeping will need to have at least one job classification assigned. Some employees may perform multiple different types of jobs. You can designate which job types the employee should have assigned and set the wage amount for each type. When creating schedules, you can specify which job class the employee should use for each shift.
Employees who use JM Connect will choose the job class each time they clock in to specify what type of work they're doing. Employees can see the job class they should use for each shift under the My Schedule icon in JM Connect.
Employees who use the call-in method for timekeeping will need to have a set schedule that designates the job class and the corresponding wage to use for that shift's time punches on your payroll reports.
To add Multiple Job Classifications and Wages:
- Click the checkbox for Multiple Wages and click save
- This will refresh and take you back to the Employee Maintenance page
- Click the edit pencil for the employee again
- Click the new Wages tab
- Select a Classification from the Job Class dropdown
- Update the hourly wage for this employee's classification
- Click save
For more information on setting up job classifications and wages, click here.
For more information, or to send in a request to the Janitorial Manager support department, use the red 'Help' button in the bottom right corner of any Help Desk article.
Comments
0 comments
Please sign in to leave a comment.