Setting up a Custom GeoFence
How do Google Maps and Custom GeoFences work together to ensure employees are on location when clocking in or out?
When an address is entered into the location's Timekeeper information box, it drops a pin from Google Maps and tells the system that this is where employees need to be in order for the location to appear on the Clock in screen.
The GeoFence determines what area on the map will be preapproved for employees to clock in from. Time punches will come in as preapproved if both the blue address pin and the employee were inside the drawn GeoFence at the time of the punch.
You can set up a custom GeoFence for each location that determines where your employees will be able to clock in from while on the location. They will need to be within the set GeoFence in order to gain access to automatic clock ins on the JM Connect app. The preapproved areas should be communicated clearly with the employees to avoid an accumulation of pending time punches or user errors due to GeoFence settings.
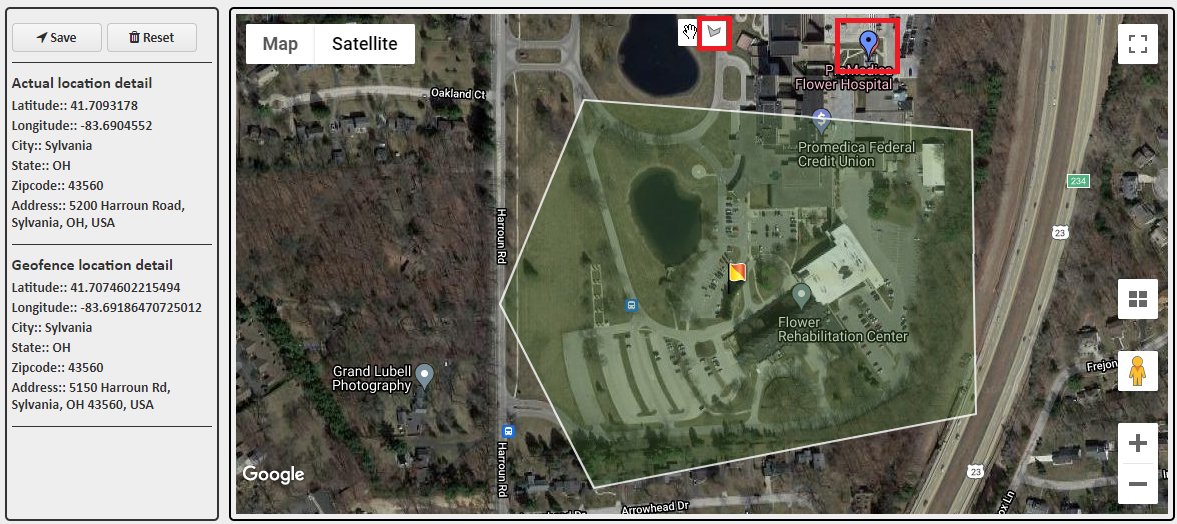
Adding a Custom GeoFence
You can easily edit the GeoFence to accommodate any unique shape on the map.
- Go to Customers > Manage locations
- Click the edit pencil on the location you wish to edit
- Select the Geo Fence sub-tab
- Use the zoom controls to view the full shape of the property you wish to custom-fit
- Click the Custom shape button at the top of the map
- Click a point and release
- This will start the shape, and allow you to draw the shape one line segment at a time
- Close the shape by clicking on the starting point
- Click Save
Always make sure the Blue Address Pin is inside the Drawn GeoFence
For more information, or to send in a request to the Janitorial Manager support department, use the red 'Help' button in the bottom right corner of any Help Desk article.
Comments
0 comments
Please sign in to leave a comment.