Why is a time punch listed as Outside the Fence?
When an employee on JM Connect clicks the 'Clock In' or 'Clock Out' button, JM Timekeeping uses the location of the employee's smartphone at the time they clicked the button and compares it to the Geo-Fence and address information specified in the location settings by an admin. If the data does not match, or if the employee's device does not have location services turned on, it may show that the employee was Outside the Fence when they clocked in or out. These time punches come through as Pending, and they need to be approved or declined by a Manager with web access to timekeeping reports.
There are three main reasons why the time punch could show as Outside the Fence.
Reason #1 - The Geo-Fence or Address Information is Incorrect
Reason #2 - The Employee is not inside the drawn geofence at the time they clicked the 'Clock In' or 'Clock Out' button
Reason #3 - The employee does not have their location correctly enabled on their smartphone
What do you see when you look at the location's Geo-Fence?
Select the image that matches what you see to jump to that section of the article! If the location's geofence is set up correctly, jump to Reason #2 to investigate the time punch.
Reason #1 - The Geo-Fence or Address Information is Incorrect
What you should NOT see:
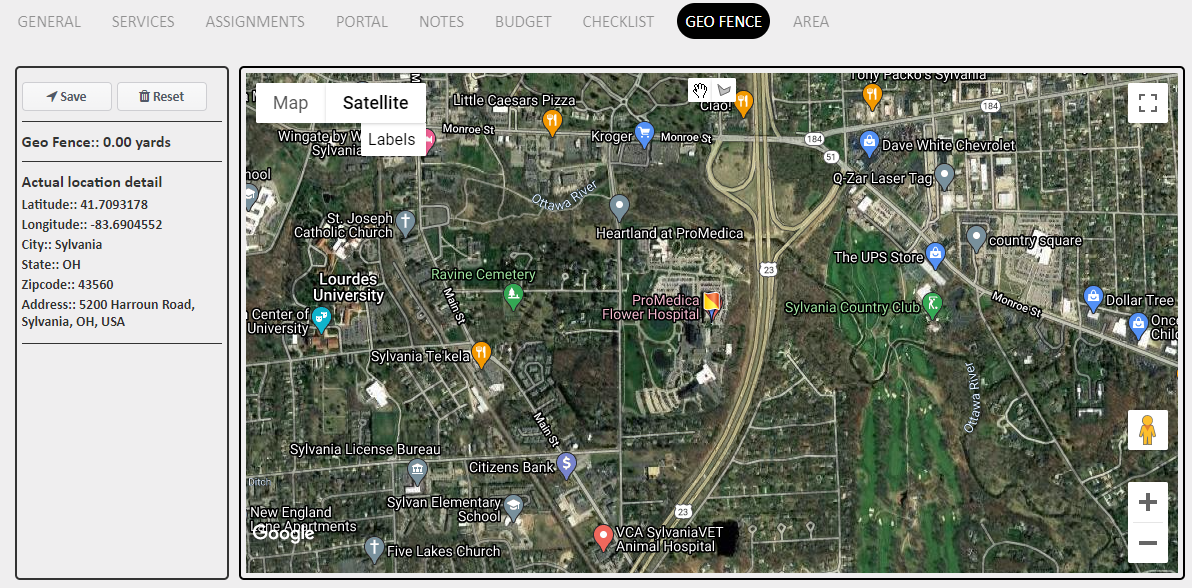
"Sorry, we have no imagery here"
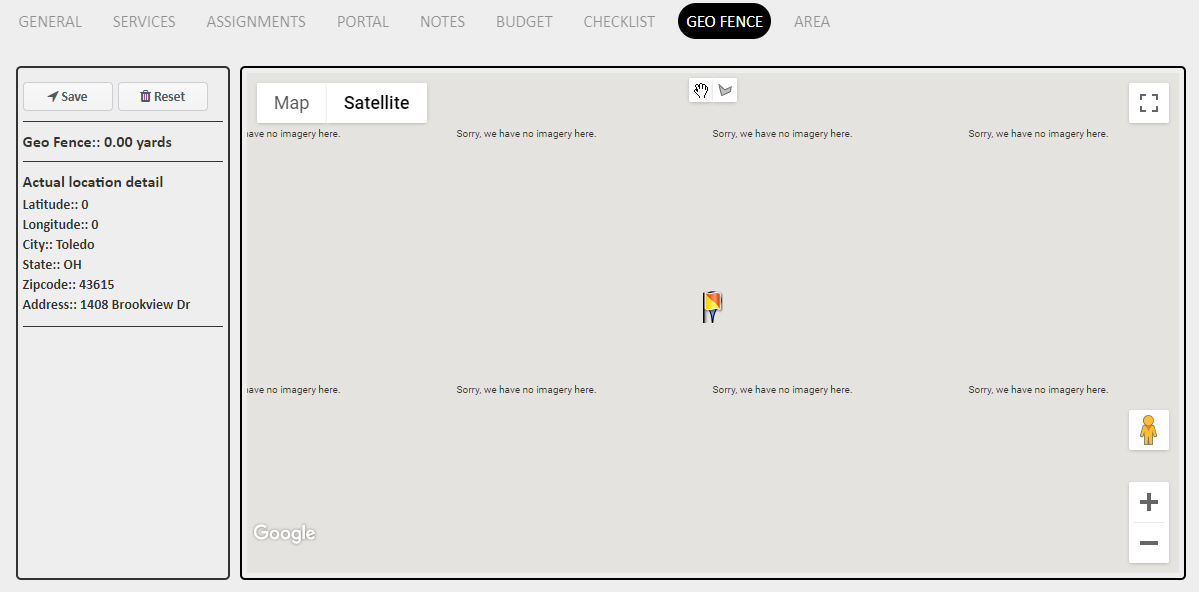
No green geofence has been drawn around the location

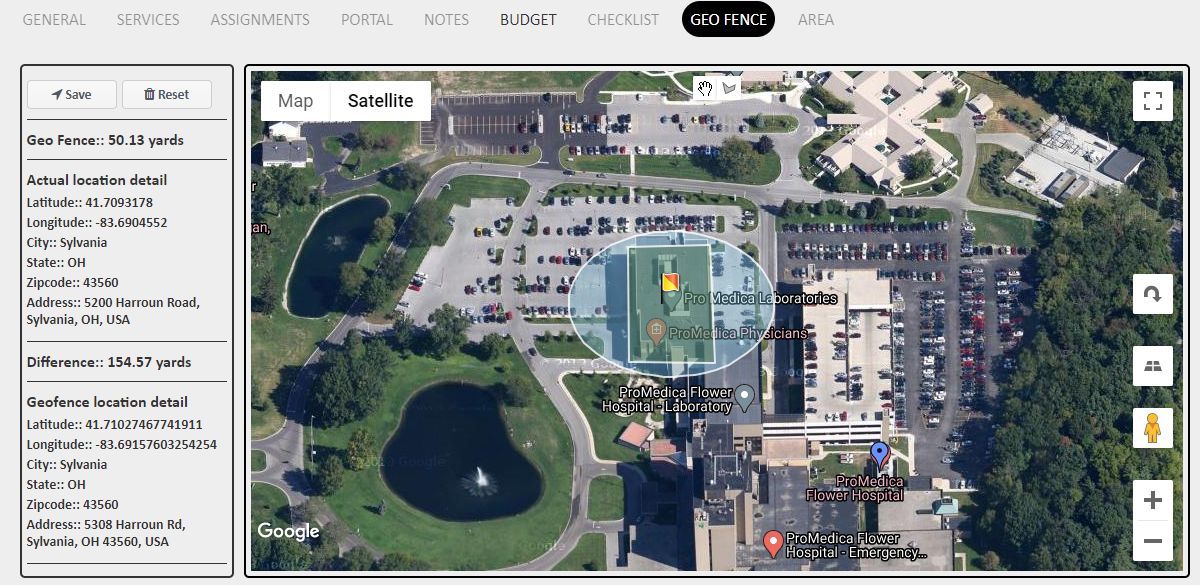
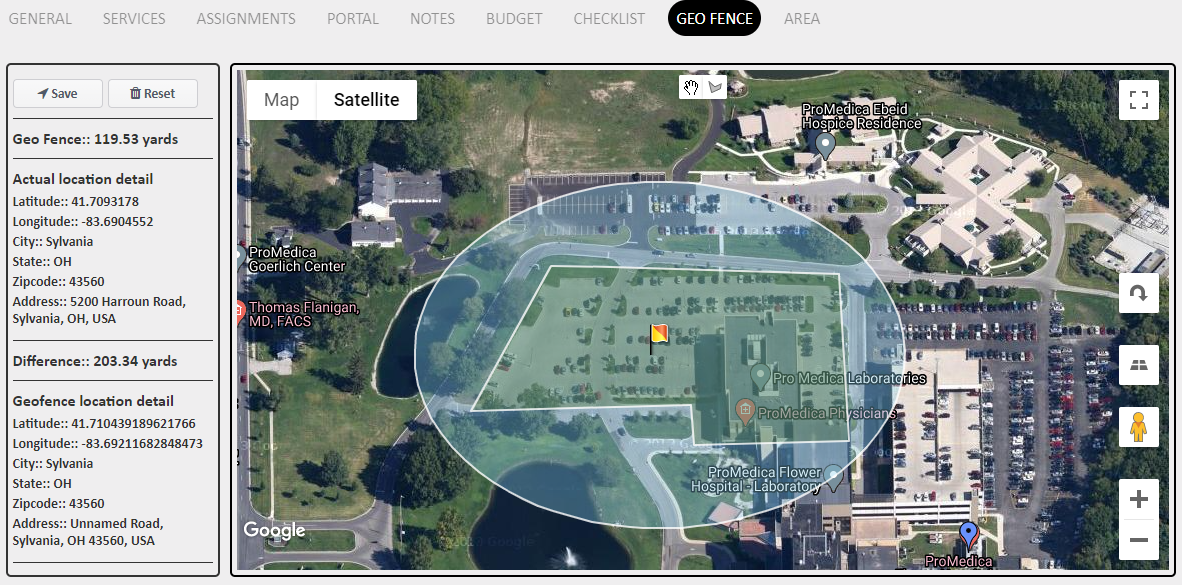
The Geo-Fence is really tight against the building

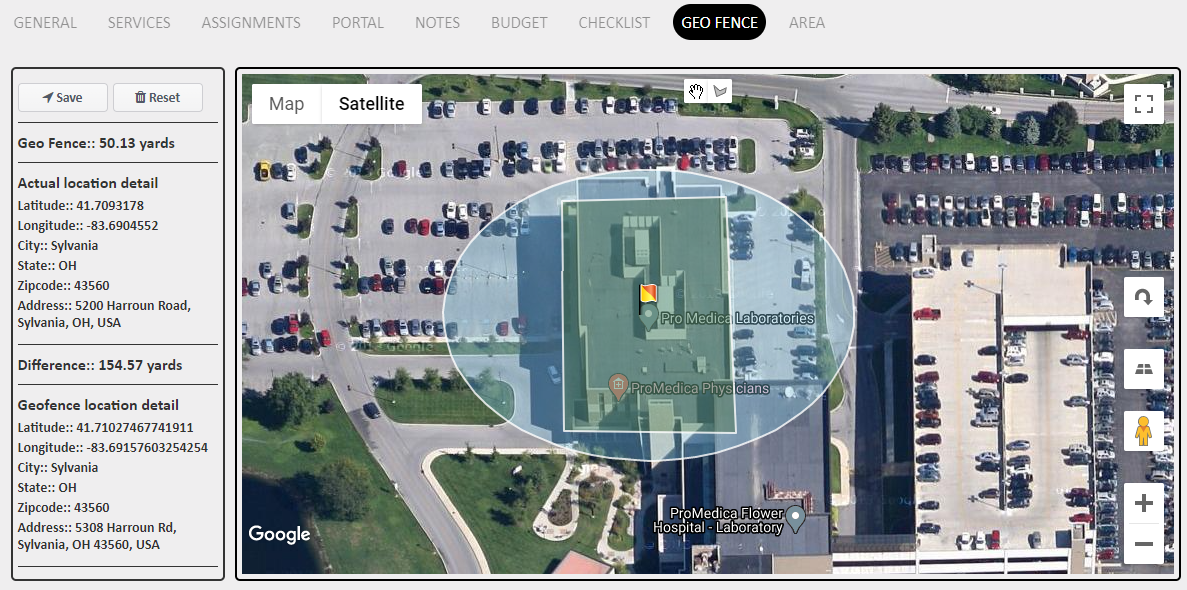
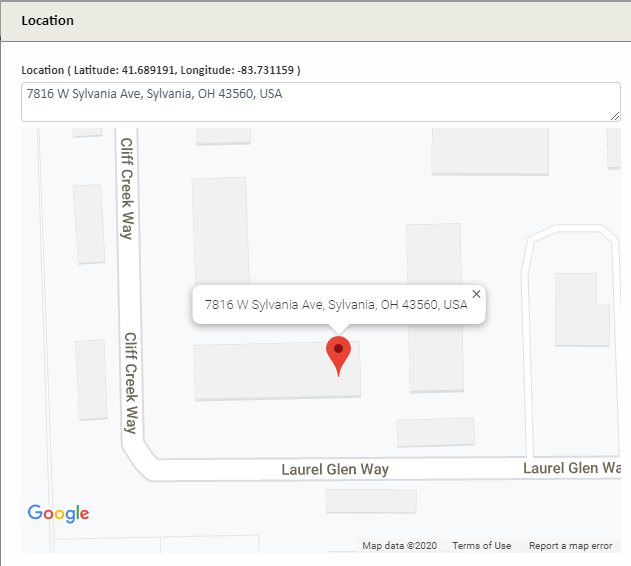
The blue address pin is not inside the drawn geofence
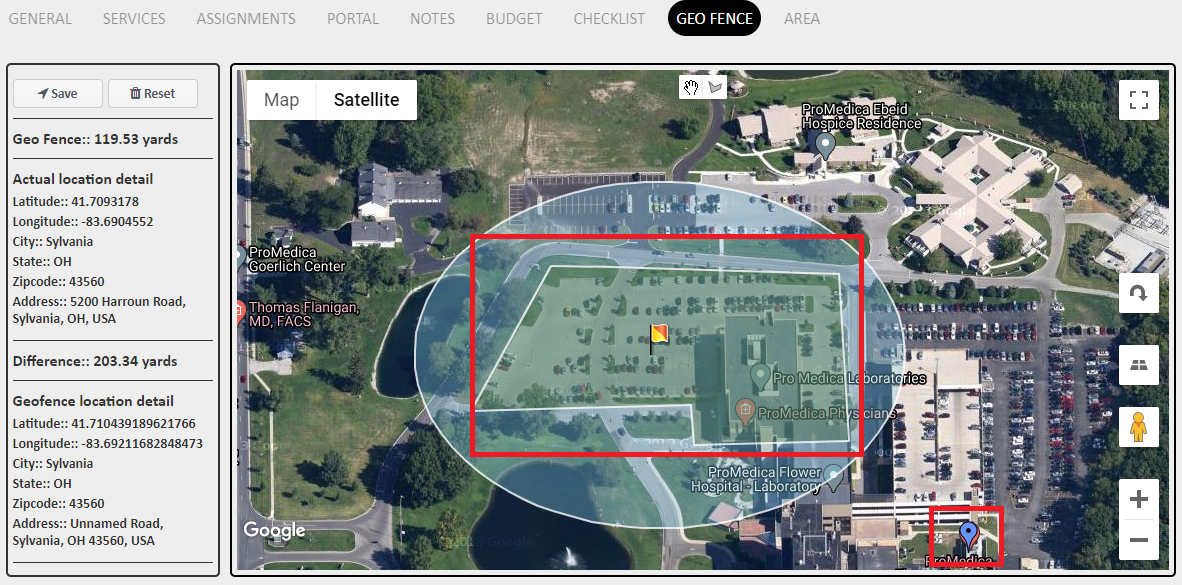
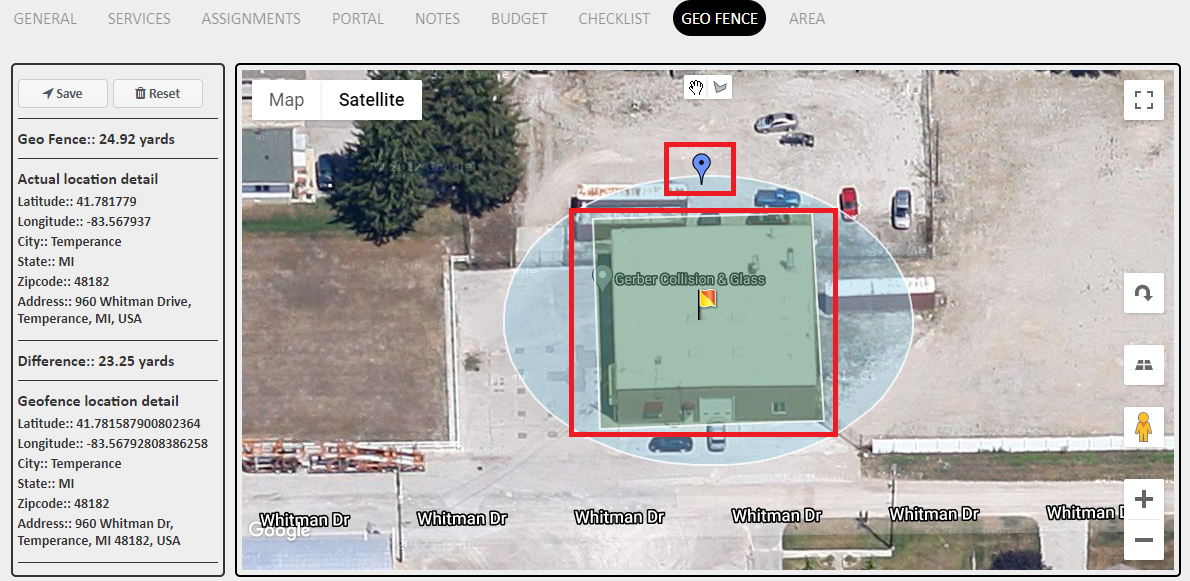
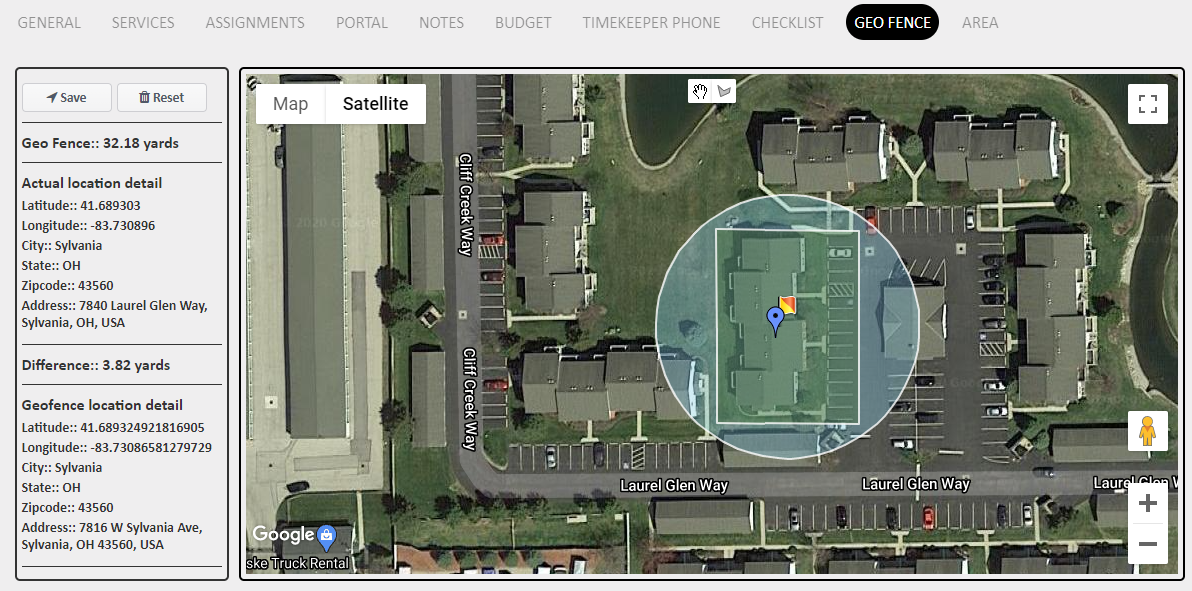
What you SHOULD see:

Reason #2 - The Employee is not inside the drawn geofence at the time they clicked the 'Clock In' or 'Clock Out' button
Reason #1 - The Geo-Fence or Address Information is Incorrect
The first thing to check when a time punch comes in as Outside the Fence is that location's geofence and address information.
Locate the Location Name of the Outside the Fence time punch and navigate to Customers > Manage Locations > find the Location > click the Edit Pencil > Select the Geo-Fence tab
What you should NOT see
"Sorry, we have no imagery here"

This means there is no address information saved for the location in the Timekeeper Information section of the location settings.
To add an address for Timekeeping settings
- Navigate back to the General tab and scroll down to the bottom right-hand corner of the location settings.
- In the box that says "Enter a location," type in or copy and paste the location's address
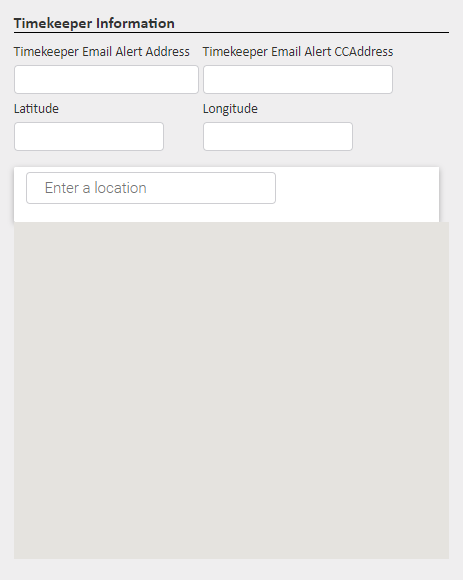
- As you are entering the address, map suggestions will pop up below.
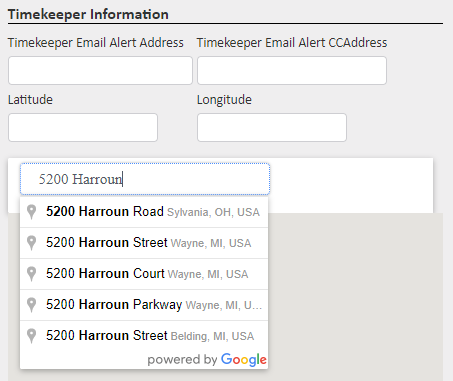
- Select the address that matches and it will enter the latitude and longitude automatically for you upon selection.
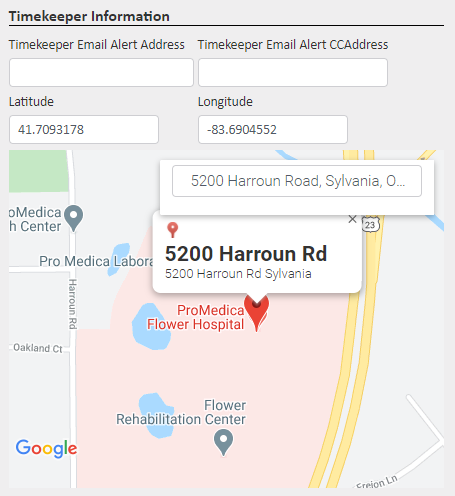
- Click Save at the top of the location settings
- Now, select the Geo-Fence tab for the location
- Continue through the next steps to see what else you should not see
What you should NOT see
No green geofence has been drawn around the location
This means you have not yet defined what area around the address should be accepted by JM in order for employee time punches to be Preapproved by management.
It is at the discretion of management to determine what is acceptable and not acceptable for employees when clocking into or out of this location. The expectations of where is acceptable (ex: inside the building) and where is not acceptable (ex: in the parking lot) should be clearly communicated to employees before they begin clocking into or out of the location to create good habits early on. This will save management time and frustration in the long run, so it's important to set clear expectations with the employees right away.
To draw the geofence:
- Place your cursor over the map where you want to zoom in, hold down CTRL, and scroll your mouse until you can clearly see the entire building you are looking for

- Change your cursor to the drawing tool by clicking on the icon at the top of the page that says Draw a shape when you scroll over it

- Your cursor turns into a + when you scroll over the map now. To draw the geofence, first, click the cursor in the furthest corner of the area you want to be deemed as acceptable to clock in or out from.
- The point where you clicked will then drag a line from that point to wherever you are going to click next
- Click the lines into place until the last finally reaches back to the first point to form a completely enclosed shape around the acceptable area.
- The geofence will turn green when the lines have all been connected at the endpoint.
- Continue to the next sections of what you should not see to understand 2 reasons why the screenshot above should not be the completed geofence
What you should NOT see
The Geo-Fence is really tight against the building
**If employees MUST be INSIDE the building in order to clock in or out according to management, then the geofence can be very close to the edges of the building. We recommend leaving a little extra space around the front door if you opt not to include the parking lots.
**If it has been deemed as acceptable by management for employees clock in or out from either inside the building, outside the building, in the parking lot, or in other designated areas, the geofence should not be placed tightly around the building. Any area that is deemed acceptable by management for clocking in or out should be included in the drawn geofence.
- If the geofence is too tight around the building and needs to be redrawn to include the parking lot or other area, click the Reset button on the left side, and click OK on the pop-up presented letting you know the geofence has been reset.
- Redraw the geofence using the steps above to include the acceptable areas
- Be sure to click Save on the left after you have redrawn the geofence
- Continue to the next section to see why the screenshot above should not be the completed geofence!
What you should NOT see
The blue address pin is not inside the drawn geofence

Even if the blue pin is inside the circle, it still should not be outside the drawn geofence.
If the blue address pin is not inside the drawn geofence, then JM will not be able to Preapprove time punches because the address location and the geofence location do not match. There is a very simple way to move the blue address pin to the desired area within the geofence by using Google Maps.
To move the blue address pin:
- Click the link above to open Google Maps
- Enter the location's address in the search bar to pull up the map
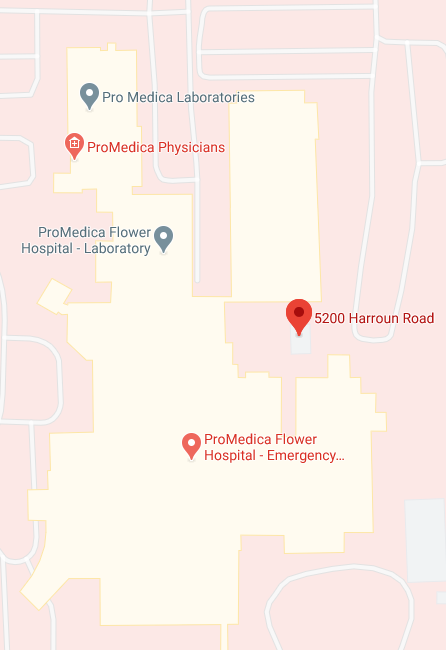
- Locate the place you want the blue pin to appear in JM and click once. A gray pin will appear. Click on the gray pin.
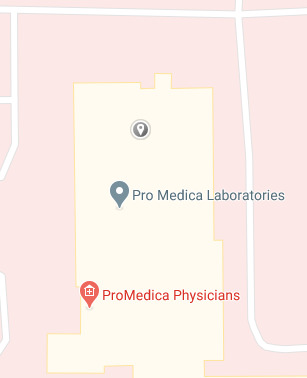
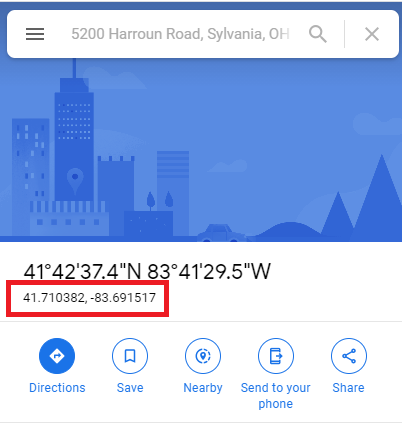
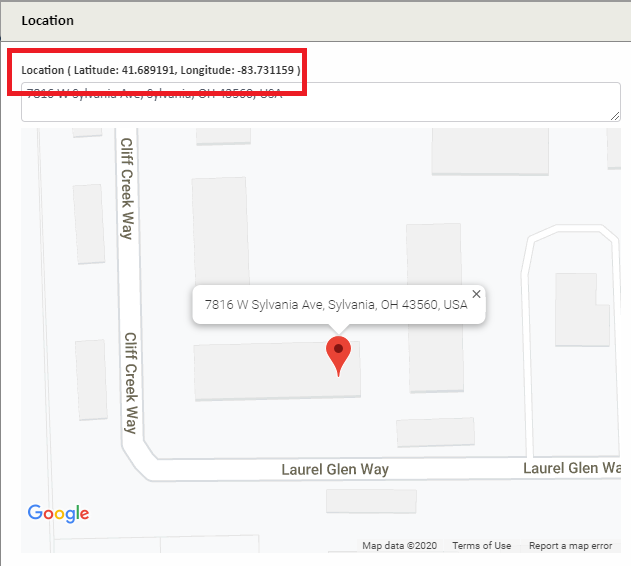
- A popup will appear at the bottom of the screen with an attached latitude and longitude. Click on the latitude and longitude and a popup will appear on the left side of the map with more information.
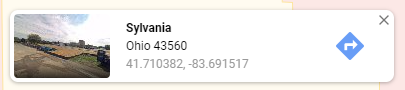
- The latitude and longitude of the gray pin you placed are listed here and are able to be copied and pasted directly into the latitude and longitude boxes in the location settings.
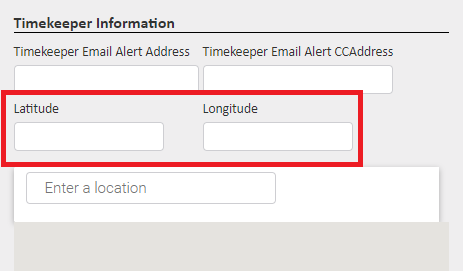
- Enter the new coordinates in the Timekeeper Information section of the location settings
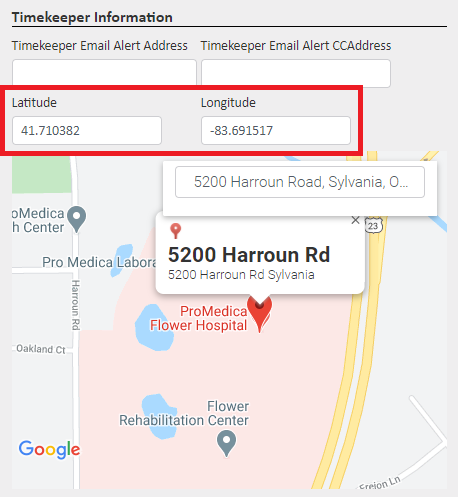
- Click Save.
What you SHOULD see
Now, select the Geo-Fence tab. The blue address pin should now appear inside the geofence based on the new coordinates entered in step 6 of the section above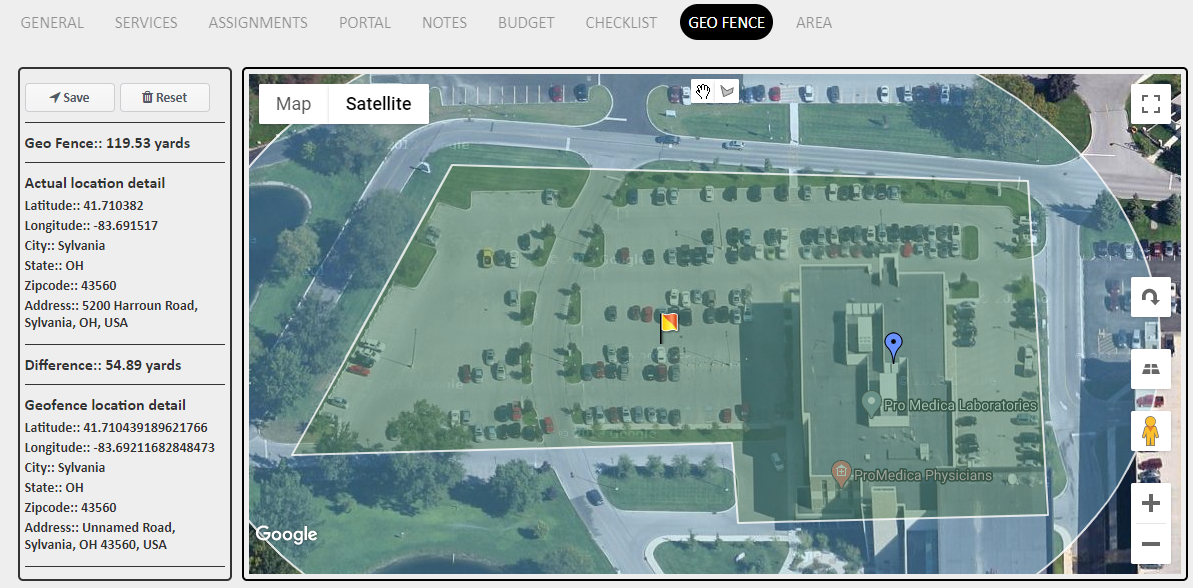
Reason #2 - The Employee is not inside the drawn geofence at the time they clicked the 'Clock In' or 'Clock Out' button
On the Clock In/Clock Out report, select the pin button in the Geo-Fence column to see where the employee was when they selected the clock in or clock out button. Here you will be able to see if the employee was inside the building, outside the building, in the parking lot, or nowhere near the location.
If the Employee was INSIDE the building
Go back to Reason #1 and check the blue address pin and the geo-fence in the location settings on the web version of JM. If all the location settings are correct, jump to Reason #3 to troubleshoot the employee's device.
If the Employee was OUTSIDE the building
If the employee was near the building, we now need to see how close to the drawn geofence they were.
There are two ways to check if the employee was inside the drawn geofence or not:
Method #1 - Using the Snipping Tool or a Screenshot of the Time Punch and Comparing it to the Drawn Geo-Fence on the Location
- Use the Snipping Tool to take a picture of the pin information on the clock in/clock out report, or take a screenshot of it on your computer
- Navigate to Customers > Manage Locations > find the Location > click the Edit Pencil > Select the Geo-Fence tab
- Compare your snip or screenshot of the time punch to the drawn geofence
- Can you tell if the location pin for the time punch is actually inside the drawn geo-fence just by comparing the two?
- The punch will show as outside the fence if the employee was within the circle, but outside the drawn geo-fence
- The punch could show as outside the fence if the employee was just barely on the edge of the geo-fence.
- Sometimes satellites are just slightly off, and if the employee is nearly on the edge of the geofence, it might register them as just outside. You could stand in the exact same spot two days in a row to clock in, and the satellite info could be slightly different each time. (They are floating around in space after all!)
- If the geofence is drawn very tightly around the location, an employee who is right outside the door or in the parking lot could potentially be listed as outside the fence even when they are on the location.
- Widening the geofence a little is an easy way to prevent this for future time punches at this location.
- The punch will show as outside the fence if the employee was within the circle, but outside the drawn geo-fence
- If comparing the two images is too close to tell if they were actually inside the fence, jump down to Method #2 below.
Method #2 - Using the Latitude and Longitude of the Time Punch to Temporarily move the Blue Location pin to the Exact Location of the Time Punch. (Easier to determine if the employee was inside the drawn geofence.)
We recommend using this option when it is too close to tell using Method #1
- Click on the pin information on the clock in/clock out report
- At the top of the pop-up window, you will see latitude and longitude captured from the time punch
- Copy the latitude and longitude and paste somewhere temporarily (Notepad, Word doc, anything! It's temporary)
- Navigate to Customers > Manage Locations > find the Location > click the Edit Pencil
- In the Timekeeper Information section in the bottom right corner of the location settings, copy the current latitude and longitude and also paste somewhere temporarily. We want to put this back when we are done with this test
- Copy the latitude and longitude saved from the time punch, and enter them into the latitude and longitude boxes for the location
- Click Save
- Now, select the Geo-Fence tab on the location
- The blue pin is now the location of the employee when they entered that time punch.

- Is the blue pin inside the drawn geofence? Outside the drawn geofence? Just barely on the edge of the geofence? In the parking lot? Down the street?
- This is where the employee was when they clicked the clock in or clock out button. If this location is acceptable, you will want to make sure that it is included in the geofence for future time punches. Click Reset on the left to redraw the geofence to include the blue pin and be sure to save.
- If you redraw the geofence to include this area, then all future time punches in this area will be accepted by the system as Preapproved and will not need to be approved manually by a manager.
- If this area is not an acceptable area to clock in or out from, communicate to the employee that they must be within the parameters set by management in order for their time punches to be accepted. This is designated by management and will need to be clearly conveyed by management to the employee. (For example: Must be inside the building, in the parking lot, on the front porch)
- If you would like to return the blue pin to its prior location before this test on the geofence, navigate back to the General tab in the location and scroll down to the Timekeeper Information section again.
- Copy the original latitude and longitude from where you pasted them temporarily in step 3 and paste them into the corresponding latitude and longitude boxes in the Timekeeper Information section.
- Click Save
- Click the Geo-Fence tab to make sure the blue pin is still located inside the drawn geofence.
Reason #3 - The employee does not have their location correctly enabled on their smartphone
Whether the employee has Android or iPhone, they will need to enable location services on their device as well as on their app. These are 2 separate settings.
Please note that JM Connect uses an employee's location for timekeeping purposes only. The only time JM Connect captures the employee's location is when they clock in or clock out. JM Connect does not track the movement of the employee. JM Connect uses location services to determine whether or not the employee is in the vicinity of the location when clocking in and out.
If the employee does not have location services enabled properly, they could experience app issues such as crashing or being unable to see the location when trying to clock in or out, and many of their time punches will appear in the reports as outside the fence time punches.
iPhone
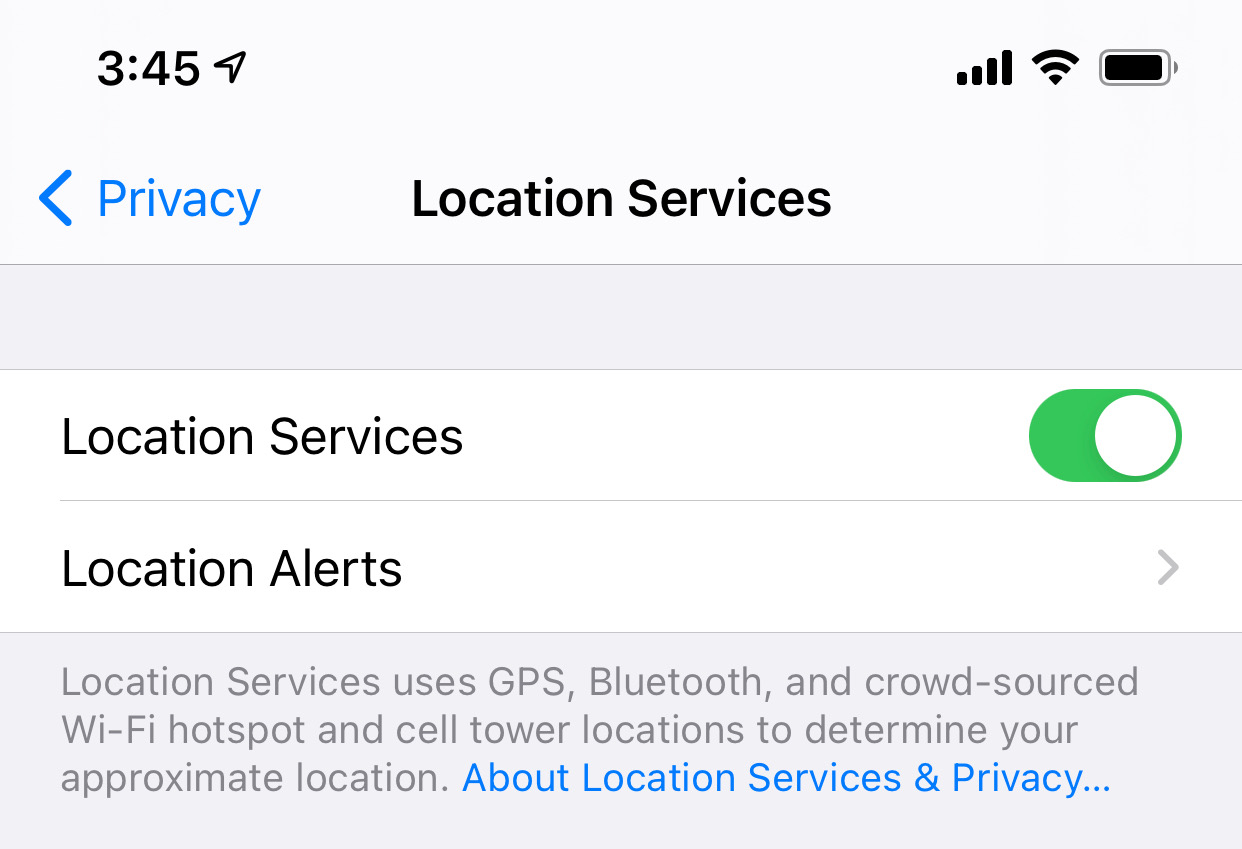
Location Services must be turned on
Settings > Privacy > Location Services
Here, the main setting for location services must be toggled on (Green)
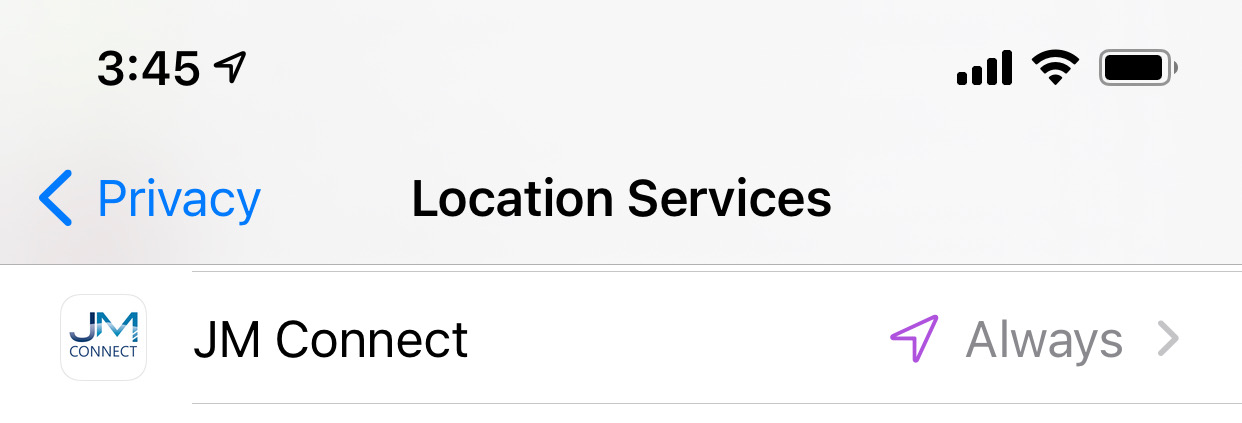
Scroll down the list of apps and click on JM Connect
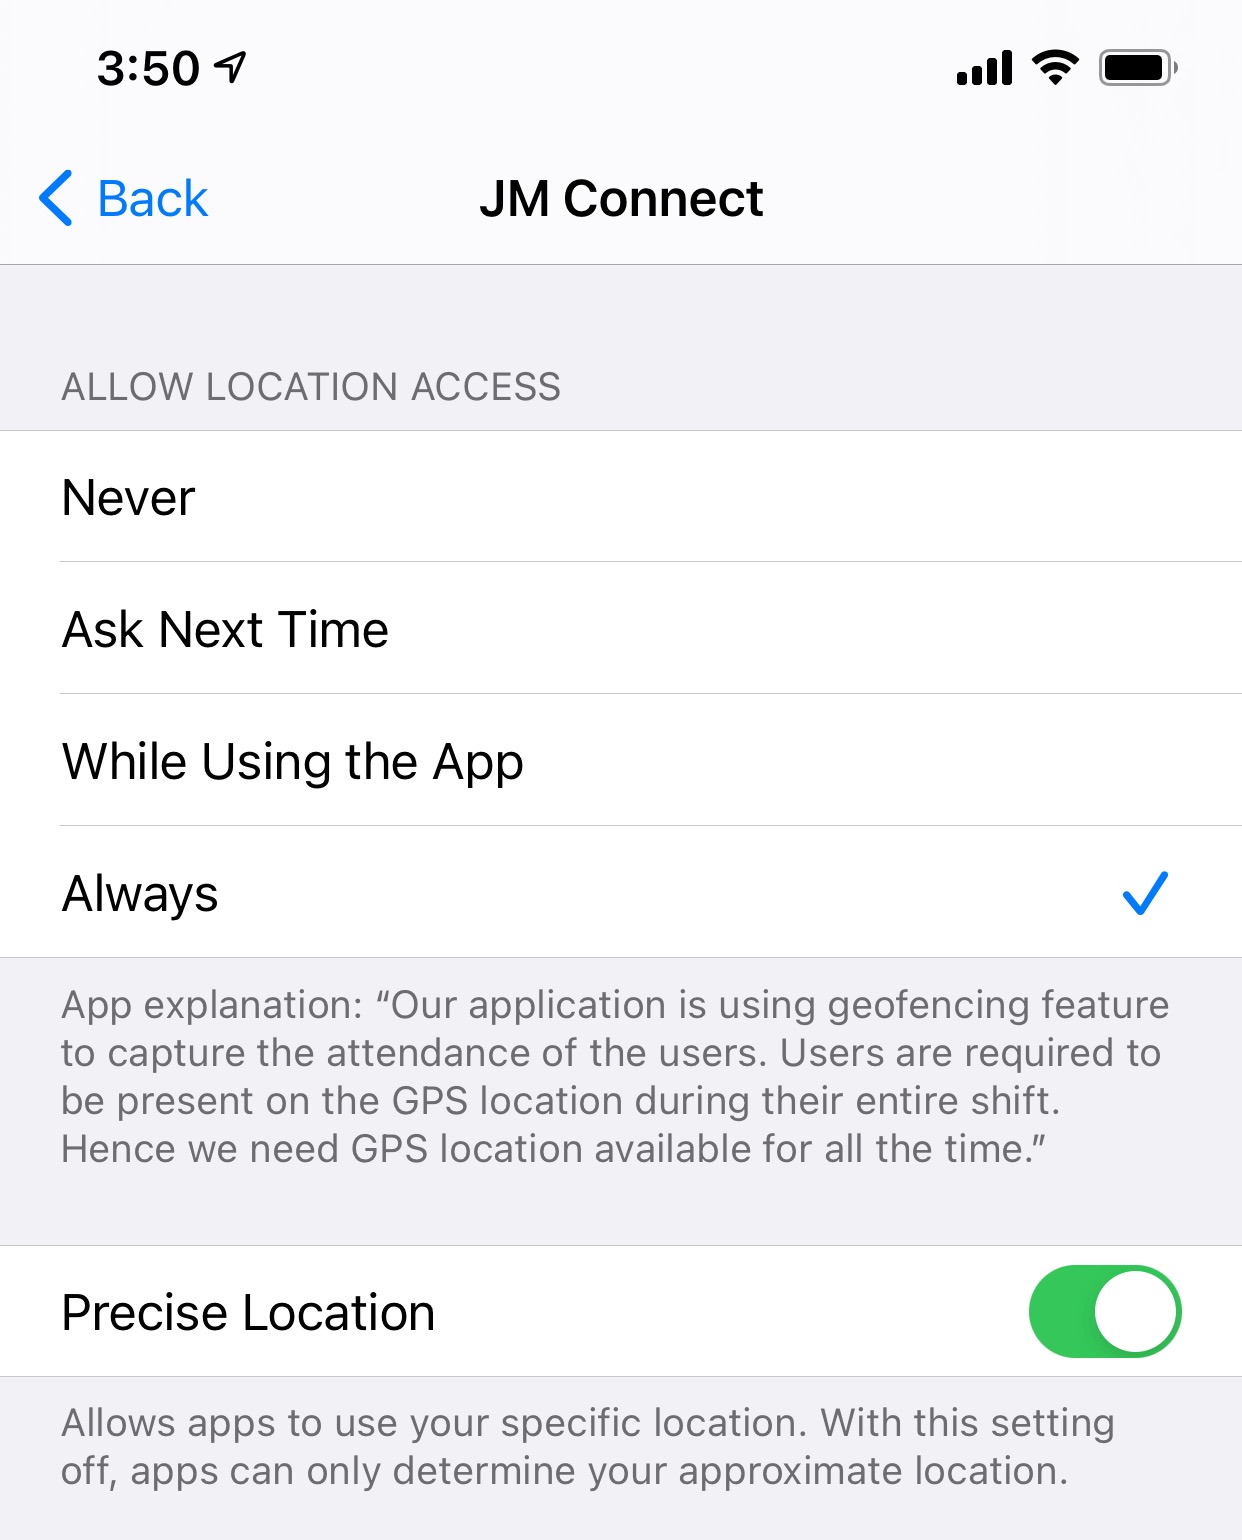
Make sure the location access is set to Always and Precise Location is toggled on (Green)
Android
Settings > Location
Make sure the location settings are toggled on
Give JM Connect location permissions:
Go to your device's Settings > Apps
Scroll down the list of apps and select JM Connect
Select Permissions
Enable the Location setting so it is in the "on" position
For more information, or to send in a request to the Janitorial Manager support department, use the red 'Help' button in the bottom right corner of any Help Desk article.
Comments
0 comments
Please sign in to leave a comment.